GA4 Setup for Webflow Nonprofits
Step-by-step guide to setting up Google Analytics 4 on a Webflow nonprofit website via Google Tag Manager — covering property creation, data streams, key event tracking for donations and form submissions, and verifying data flow.

GA4 Setup for Webflow Nonprofits
Google Analytics 4 is the current version of Google’s analytics platform. If your nonprofit website does not have GA4 configured, you have no reliable data on who visits your site, how they find it, what they do when they arrive, or whether your donation and contact flows are working.
This guide covers setting up GA4 on a Webflow nonprofit site using Google Tag Manager. If you have not yet installed GTM, complete that first — see Google Tag Manager Setup for Webflow Nonprofits.
Before You Start
You will need a Google account with access to create analytics properties. If your organisation already has a Google Analytics account from a previous version (Universal Analytics), you should create the GA4 property within the same account for cleaner organisation.
You will also need admin access to your Google Tag Manager container and the ability to publish tags. If a previous developer or agency set up GTM for your organisation and you do not have access, resolve that first — analytics configuration without GTM access means you are dependent on someone else for every future change.
Step 1: Create a GA4 Property
Go to analytics.google.com and sign in with the Google account your organisation uses for analytics. If you do not have an account yet, you will be prompted to create one.
Click Admin (the gear icon at the bottom left). Under the Property column, click Create Property. Enter your organisation’s name as the property name. Select your reporting time zone (this affects how days are counted in reports) and your currency.
On the next screen, select Nonprofit as the industry category if available, otherwise select the closest match. For business size, select the range that fits your organisation. Click Create.
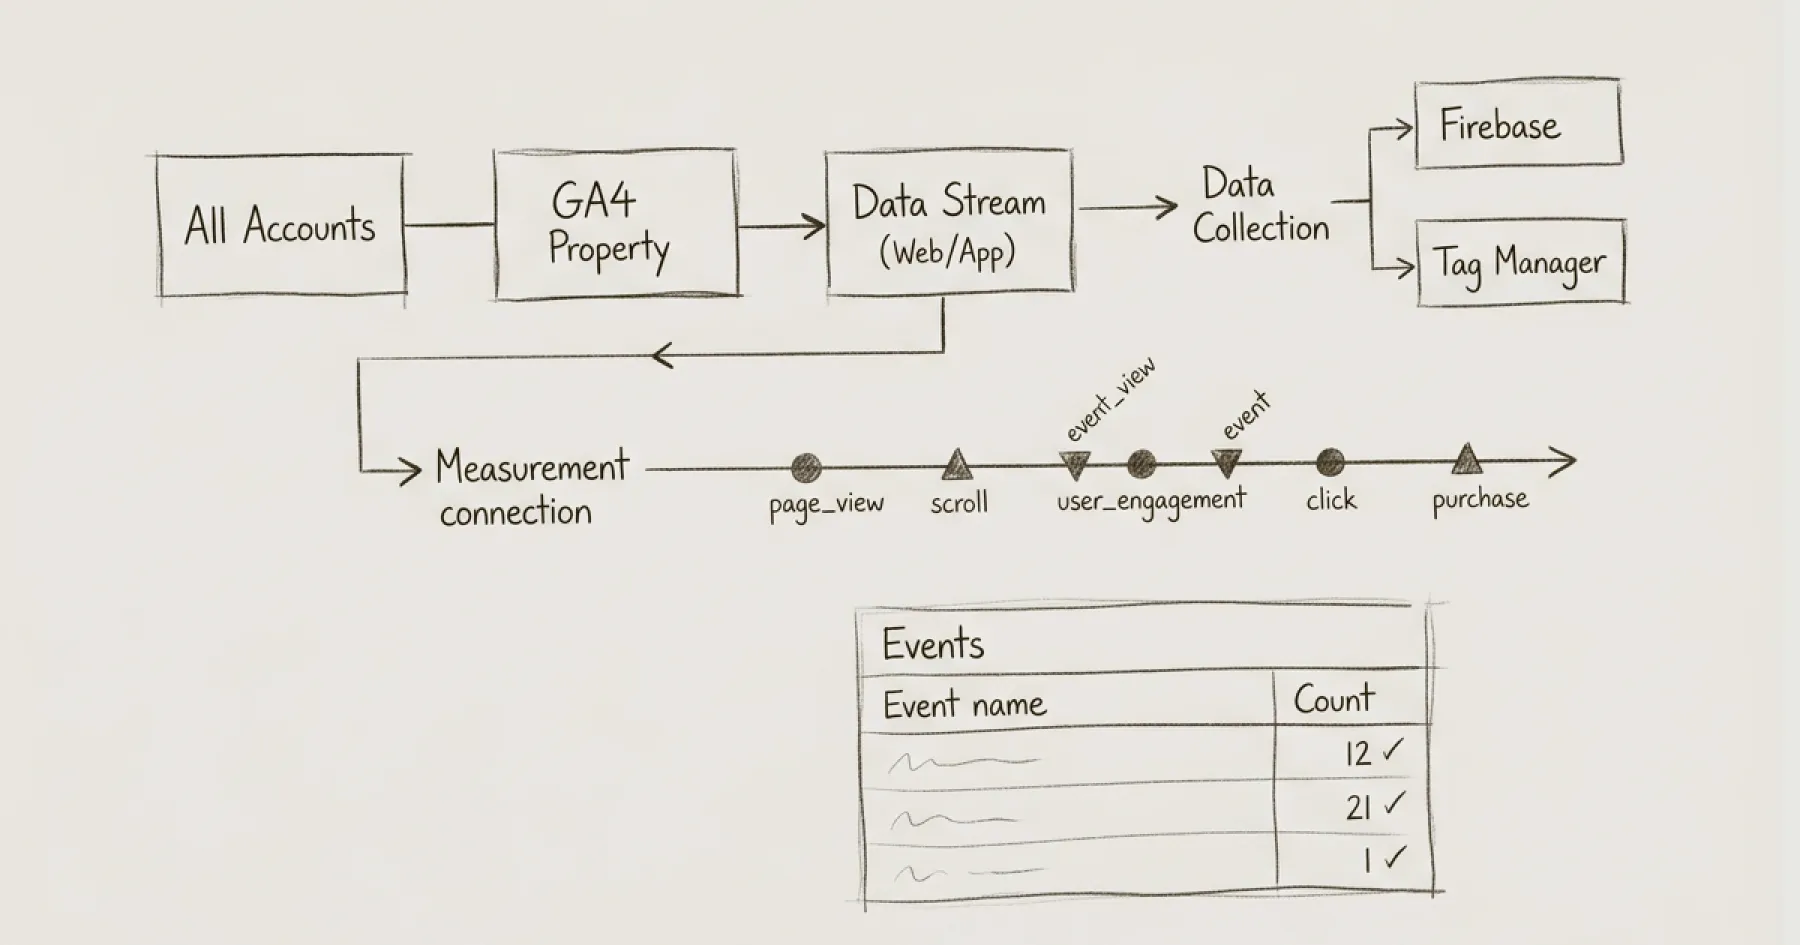
Step 2: Set Up a Web Data Stream
After creating the property, GA4 will ask you to set up a data stream. Select Web. Enter your website URL (e.g. www.yourorganisation.org) and give the stream a name (e.g. ‘Main Website’).
Leave Enhanced Measurement enabled — this automatically tracks page views, scrolls, outbound clicks, site search, and file downloads without any additional configuration. These are useful baseline metrics for nonprofit websites.
Click Create Stream. You will see a Measurement ID that starts with G-. Copy this ID. You will need it in the next step.
Step 3: Install GA4 via Google Tag Manager
Open your GTM container at tagmanager.google.com. Click Tags in the left sidebar, then New.
Name the tag something clear: GA4 — Configuration.
Click Tag Configuration and select Google Analytics: GA4 Configuration (if using the older GTM interface) or Google Tag (if using the newer interface). Paste your Measurement ID (G-XXXXXXXXXX) into the Tag ID field.
Click Triggering and select All Pages. This ensures GA4 loads on every page of your site.
Save the tag. Do not publish yet — use Preview mode first to verify it is working.
Step 4: Verify in GTM Preview Mode
Click Preview in the top right of GTM. Enter your website URL. GTM’s Tag Assistant will open in a new tab connected to your live site.
Navigate around your site. In the Tag Assistant panel, you should see your GA4 Configuration tag listed under Tags Fired on every page. If it appears under Tags Not Fired, check your trigger configuration.
Once you have confirmed the tag fires on multiple pages, go back to GTM and click Submit to publish the container. Your GA4 is now live.
Step 5: Verify Data in GA4
Go back to analytics.google.com and navigate to your property. Click Reports then Realtime. You should see your own visit appearing within a few seconds. If you see activity in the Realtime report, GA4 is collecting data correctly.
If you do not see activity, check that you have not blocked analytics via an ad blocker or that your CookieYes consent banner is not blocking GA4 before consent (which is correct GDPR behaviour — you will only see data from users who have accepted analytics cookies).
Step 6: Configure Key Events for Nonprofits
GA4 uses Key Events (previously called Conversions) to track the actions that matter most. For nonprofit websites, the key events to configure are:
Donation completions. If your donation platform (Fundraise Up, Donorbox, every.org, Givebutter) fires a JavaScript event or redirects to a thank-you page after a completed donation, you can track this as a key event. The exact implementation depends on your donation platform — most provide GTM integration documentation.
Form submissions. Webflow native forms trigger a form submission event that GA4’s Enhanced Measurement can detect automatically. Check whether your contact, volunteer sign-up, or enquiry forms are appearing in GA4 under Events. If they are, you can mark them as Key Events by clicking the toggle in the Events list.
Newsletter sign-ups. If your email sign-up is handled through a third-party embed (Mailchimp, Campaign Monitor), you may need a custom event tag in GTM to track completions. This typically involves firing a tag when the user reaches the thank-you state of the sign-up widget.
File downloads. GA4’s Enhanced Measurement already tracks file downloads (PDFs, documents). Check under Events for file_download events. For nonprofit websites, this captures downloads of annual reports, governance documents, and impact reports — all useful signals of funder engagement.
To mark any event as a Key Event, go to Admin → Events, find the event in the list, and toggle the Mark as key event switch.
Step 7: Link Google Search Console
If your organisation has Google Search Console verified (and it should — see Technical SEO Audit for Nonprofits), link it to GA4 for integrated search data.
In GA4, go to Admin → Product Links → Search Console Links. Click Link and follow the prompts to connect your Search Console property. This allows you to see search queries, landing pages, and search performance data directly within GA4 reports.
Step 8: Set Up a Basic Reporting View
GA4’s default reports are adequate for most nonprofit websites. The reports you should review monthly are:
Acquisition overview. How people find your site — organic search, direct, social, referral. This tells you which channels are driving traffic and where to invest effort.
Engagement overview. Which pages people visit, how long they stay, and what actions they take. Focus on your programme pages, donation page, and governance section.
Key Events report. How many donations, form submissions, and newsletter sign-ups occurred. This is the data your Board actually needs to see.
For how to translate these metrics into Board-level reporting, see the upcoming post on Website Analytics That Matter for Board Reporting.
Consent Mode and GDPR
If your site uses CookieYes or another consent management platform (and it should — see CookieYes and Consent Mode V2 Setup), GA4 will only collect data from users who consent to analytics cookies. This is correct behaviour under GDPR.
GA4 supports Consent Mode V2, which sends anonymised pings even when consent is denied, allowing GA4 to model overall traffic without tracking individual users. This is configured at the GTM level and covered in the CookieYes setup guide.
Do not disable consent requirements to inflate your analytics numbers. The data you collect with consent is more accurate and more useful than inflated numbers that include users who have not agreed to be tracked.
What GA4 Does Not Tell You
GA4 tells you what is happening on your website. It does not tell you why. A drop in traffic could be a seasonal pattern, a technical problem, or a content relevance issue. A low conversion rate on your donation page could be a design problem, a trust problem, or a targeting problem.
Analytics data is an input to decision-making, not a substitute for it. Combine what GA4 shows with stakeholder feedback, accessibility testing, and periodic content audits to build a complete picture of how your website serves the organisation.
For the broader performance monitoring framework, see Website Performance Monitoring for Nonprofits. For setting up the tag management foundation that GA4 depends on, see Google Tag Manager Setup for Webflow Nonprofits.
Eric Phung has 7 years of Webflow development experience, having built 100+ websites across industries including SaaS, e-commerce, professional services, and nonprofits. He specialises in nonprofit website migrations using the Lumos accessibility framework (v2.2.0+) with a focus on editorial independence and WCAG AA compliance. Current clients include WHO Foundation, Do Good Daniels Family Foundation, and Territorio de Zaguates. Based in Manchester, UK, Eric focuses exclusively on helping established nonprofits migrate from WordPress and Wix to maintainable Webflow infrastructure.
Not sure where your site currently stands?
A Blueprint Audit tells you exactly what needs to change — and why.
Before implementing anything new, it's worth knowing what your current site is and isn't doing for your stakeholders. The Blueprint Audit gives you that clarity in two to three weeks.
Related Resources
GA4 Setup for Webflow Nonprofits
Step-by-step guide to setting up Google Analytics 4 on a Webflow nonprofit website via Google Tag Manager — covering property creation, data streams, key event tracking for donations and form submissions, and verifying data flow.
Join our newsletter
Subscribe to my newsletter to receive latest news & updates